Personally I had forecasted World of Warcraft to "borrow" the idea of public quests in the next expansion. But given the success of Rift, apparently Blizzard decided that this couldn't wait. So today they announced that public quests will be introduced already in patch 4.3.
Details are still a bit sketchy, but apparently the public quests will be tied to Deathwing attacks. So instead of just burning everything and giving players an achievement, Deathwing will open up invasion portals with the usual cast of Twilight's Hammer cultists and dragonkin coming through. Players in the area will receive a warning of the invasion, and have to work together to close those portals, before the invasion takes over the various quest hubs in the area. In the area around the portals there will be some open group system, and beating back the invasion will reward players with judgement and valor points to buy gear with.
Using Deathwing for the public quest system suggests to me that this is an experiment, because obviously Blizzard won't be able to use the same baddy in the next expansion. Although of course the principle is probably useable with most sorts of expansion final boss. I doubt they'll go back to Northrend and do Scourge invasions controlled by the Lich King though, as nobody is playing in those zones any more. Makes you wonder how public quest invasions will play out in the long term with players abandoning old zones.
Thursday, March 31, 2011
Wednesday, March 30, 2011
Ultima Online's third sequel
Ultima Online was released in 1997. Already in 1999 a sequel was announced, called first Ultima Online 2, then renamed Ultima World Online: Origins; it was cancelled in 2001. Then the Ultima X: Odyssey MMORPG was announced, but also got cancelled before release in 2004.
There are currently rumors about EA having a "secret project" for another Ultima Online sequel. Which would be the third. I wouldn't get up my hopes too high. This is not likely to be a real MMORPG or in any way a spiritual successor to Ultima Online. We are more likely to just get a cheap knockoff Facebook game further exploiting the Ultima brand, after the already shameful Lords of Ultima Free2Play browser strategy game.
There are currently rumors about EA having a "secret project" for another Ultima Online sequel. Which would be the third. I wouldn't get up my hopes too high. This is not likely to be a real MMORPG or in any way a spiritual successor to Ultima Online. We are more likely to just get a cheap knockoff Facebook game further exploiting the Ultima brand, after the already shameful Lords of Ultima Free2Play browser strategy game.
Gamification
It is not that I don't agree with Heather Chaplin's rant against gamification. It's more that I don't have a comment any more, because I wrote all I had to say about the subject a year ago. Short version: Real life is not the same as a game, because the risks are different. Thus you can't easily "gamify" real life.
Tuesday, March 29, 2011
Whose story?
Following some comments of readers on my The Sims Medieval review, saying that TMS had received "mixed reviews", I checked out Metacritic. Currently The Sims Medieval has a Metacritic score of 82, thus very similar to for example Rift at 83, and the same as Dragon Age II. Metacritic calls that "good" reviews, the "mixed" review category starts at 70 and below. But what was certainly "mixed" about the The Sims Medieval reviews was that when you cast your net wider, you will find everything from "worst game ever" to "absolutely fabulous". And, as already remarked earlier, it is usually The Sims fansites who give the less good reviews. People who come from role-playing or online role-playing games usually give The Sims Medieval better grades.
The German print magazine with PC reviews I'm subscribed to gives The Sims Medieval a mediocre 74 score, and complains about the quests restricting gameplay too much, and the mini-games for the crafting getting boring. At that point I realized that while the reviewer might have a point, the reason why MMORPG players tend to like The Sims Medieval is that in a MMORPG the quests are a lot *more* restrictive, and crafting without a mini-game is even more boring than with one.
So while browsing reviews I stumbled upon a review of a completely different game, the Gamespy review of Homefront. Quote: "Homefront is a modern (by which I mean "oppressively linear and highly scripted") FPS stripped of all pretense." So role-playing games aren't the only genre suffering from being oppressively linear and highly scripted. But for me this shows that the famous fourth pillar of storytelling risks overwhelming some games or even whole genres.
The problem is that the stories being told aren't mine any more. The more a game is linear and scripted, the less control I have over the story, and the more it feels like me passively watching a pre-packed story I couldn't care less about. I don't bloody care why exactly NPC Farmer Brown wants me to go into the forest and kill ten foozles, so even voice-acting won't make me any more interested in that story. What I want is my own story.
But that doesn't mean I want a completely empty slate. I certainly don't want something like Second Life. In games where the players are given all sorts of freedom to create whatever they want, the developers are forced to discuss concepts like Time To Penis (TTP) which describes how long it takes for the editor to be used to create something obscene. In MMORPGs where players are given freedom and PvP, they end up organizing ganking events.
Thus the art of a good game is to create an environment which offers sufficient freedom for players to create their own stories in, but with sufficient guidance to avoid them just wandering around completely lost, or so bored that they start annoying each other. Neither a pure themepark, nor a pure sandbox, but something in between. The Sims Medieval is certainly somewhere in between, which is why I like it, but unfortunately it isn't a MMORPG. WoW/AoC/Rift/LotRO are all too much on the themepark side for me. And A Tale in the Desert too far on the sandbox side. The previews of Guild Wars 2 are looking good, but I've long ago learned to not cheer for a MMORPG before I actually played it.
It all comes down to replayability and entertainment value. Highly scripted linear stories can be good, but at best only once. A game with total freedom and no goals at all gets boring fast, there is a reason why adults don't play in real sandboxes any more. But if a game can create an interesting environment where your decisions lead to the story being different every time you play through it, there is the potential for endless fun.
Monday, March 28, 2011
On the difficulty of intelligent discussion about MMORPG features
This is a blog about massively multiplayer online role-playing games. In general. With some posts about games in general, technology, and blogging thrown into the mix. This is *not* a "WoW blog" or a blog about any other specific MMORPG. Unfortunately it has become evident over the years that most people are simply unable to discuss MMORPG features in general, without attaching themselves to specific implementations of those features. So I usually discuss features of specific games, so people know what I'm talking about. And of course quite often the example chosen is from WoW, because that is one of the games I know best, and where I can assume that most of my readers know it as well.
The disadvantage of discussing features of specific games is that MMORPG players are so bloody tribal. Thus exactly the same feature will be described as the greatest thing ever in somebody's favorite game, while simultaneously being condemned as being utter shit in another game the writer happens to hate. That makes it pretty much impossible to hold any sort of intelligent discussion on the merits of a a features by itself.
I was thinking about that while pondering the feature of automated group formation, that is groups forming by means other than one player inviting another player. There are a lot of possibilities how that could be implemented in a game: People could flag themselves as willing to group and be automatically grouped with players in the same area. Or people could sign up to group for a specific purpose or target, and then be automatically grouped with others going for the same target.
Such a feature has some inherent advantages: By making forming a group easier, it is more likely that people end up playing in a group than playing solo; which in turn makes it more likely for them to meet new friends. Furthermore with MMORPG endgames often being dominated by group content, automated group formation makes it more likely that a player arriving at the endgame already has some basic group combat experience, and you don't run into the problem of the tank not knowing where his taunt button is.
On the other hand the automated grouping feature has some inherent disadvantages: If you only need to press a button to get invited into a group, there is no need to politely ask for an invite. Getting into groups easily means that some people don't feel the need to display any sort of even basic politeness or decency. Thus automatically formed groups can end up being either just totally silent, or worse they can become a platform for absolute jerks.
What is important to notice is that these advantages and disadvantages are inherent to the feature, and not all that much influenced by any specific implementation of it. The harder it is to form a group, the more effort players will exert to keep to group together, which means being nicer to other players. So the convenience of easy group formation goes hand in hand with the risk of anti-social behavior. A strict invitation-only system forms groups less often, and has people waiting for groups more often, but if players need to be social to get into a group they will be, and thus groups formed on invitation only are on average "nicer".
When people notice this, they usually notice it in a specific game they are playing. For example Melmoth wrote a rather brilliant piece on Rift's default-to-open group system feeling sometimes a bit impersonal and antisocial. Others blame Blizzard for having made World of Warcraft more antisocial with the Dungeon Finder. And the frustrating thing is that the WoW fans will find the Dungeon Finder great and hate the public groups of Rift, while the Rift fans will praise the Rift open groups and blast the WoW Dungeon Finder. Thus the discussion quickly breaks down to petty bickering between fanbois, and yet another intelligent discussion about a MMORPG feature, and the greater balance between convenience and social gameplay is avoided.
Sunday, March 27, 2011
The Sims Medieval Review
I never wrote a list of what features of The Sims 3 I found boring. So it is somewhat spooky how EA managed to get hold of that list and to eliminate exactly those boring features from The Sims Medieval (TSM), and to replace them by some rather good role-playing game elements. Gone, of course, is the boring American suburb setting: Instead of playing rather ordinary people you now play the monarch of a fantasy / medieval kingdom, plus several of his subjects, from the wizard to the blacksmith. Gone are 4 of the 6 needs, with only hunger and energy remaining: No longer are you spending most of your day on potty breaks or under the shower, you now have more time to do the fun stuff, or pursue your quests and responsabilities. And gone is the general lack of purpose: The game is now organised in campaigns called "ambitions", and structured into quests.
The quests are definitively the highlight of The Sims Medieval, because they are putting what modern MMORPGs call a "quest" to shame. In TSM a quest is closer to the original meaning of the word, a search, a medium-term goal with several sub-tasks. Here the game for me pretty much hits the sweet spot between sandbox and themepark gameplay: While you are always on a quest while playing, there is no time-limit. If you neglect your quest tasks too long, the game gently reminds you of that by lowering your focus and quest progress. But in general you have plenty of time for all sorts of other activities; and blindly just following the quest tasks is actually not even giving you the best result, as you need the other activities to keep your focus bar high.
Not only are quests thus much longer than a "kill 10 foozles" trivial errand in a MMORPG, but The Sims Medieval also offers plenty of choices during each quest. Already when starting the quest you can often choose an "approach", for example when a wild boar appears you can choose whether to try to hunt him or to save him from other hunters. If the quest isn't made for one specific profession, you can choose which of your characters to play the quest with. And during the quest tasks, and during other events, you often have choices to make on how to proceed. Choices with actual consequences! Because there is no over-arching scripted story, you aren't fobbed off with fake decisions all leading you back to the same story on rails.
But of course TSM is still a Sims game, that is there are plenty of sandbox elements. While you can't change any more how big your houses are and where the walls are, you can still furnish your various buildings. Your characters can still interact with other sims, be it NPCs or your own characters. Every character has traits, normally two positive and one negative one. New, and playing more like a MMORPG, is the ability to gather herbs and ores from nodes distributed all over your kingdom, and to craft items from the resources thus gathered. And your kingdom has lots of interesting locations your sims can interact with.
Of course The Sims Medieval is no MMORPG, but it is an interesting demonstration of what a MMORPG *could* be if developers wouldn't neglect the "world" aspects so much. In spite of being mostly populated by NPCs, your litte TSM kingdom feels a lot more alive than the totally static worlds of online games. People go about their business, and your actions and choices make a visible difference to their virtual lives. And that makes The Sims Medieval a lot of fun. Recommended!
Friday, March 25, 2011
Moving a stack of items in The Sims Medieval
Pro tip for The Sims Medieval: If you want to move a whole stack of items, for example from your inventory to the larder or to stock the crafting workbench, you need to click on the lower right corner of the stack and drag the items that way. If you click in the middle of the icon, you move them one by one.
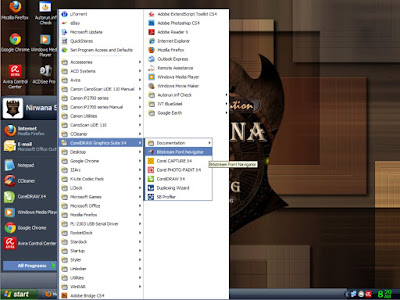
Menggunakan Bitstream Font Navigator di coreldraw
Menggunakan Bitstream Font Navigator di coreldraw > Bitstream Font Navigator memungkinkan Anda Untuk mengakses Font dengan cepat dan mudah
Sumber Rujukan : www.corel.com
Rating: 5
- Cari font pada drive lokal anda ( bila sudah ada Fontnya ) dan menambahkannya ke Katalog Font sehingga Anda dapat mengakses semua font yang tersedia pada sistem Anda dari satu Folder
- Menginstal dan uninstall font dengan cara menyeret dan menjatuhkannya di folder Font. ( Program > C:\WINDOWS\Fonts )
- Mengatur font dalam Grup yang dapat anda instal dengan mengklik jalan pintas
- Melihat dan mencetak contoh font
- Click Start > All programs > CorelDRAW Graphics Suite > Bitstream Font Navigator

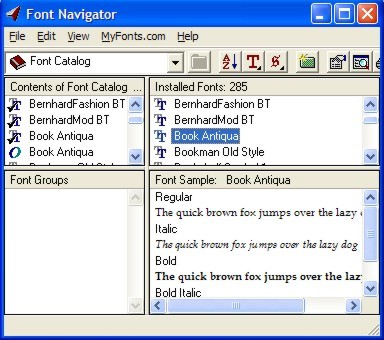
- Dalam kotak dialog Bitstream Font Navigator, Pilih Font Katalog, Atau Pilih drive / folder lalu pilih font yang ingin Anda instal atau gunakan.
- Pilih font yang ingin Anda instal.
- Untuk memilih lebih dari satu font secara acak, Teka Ctrl lalu klik / pilih Font yang anda inginkan.
- Untuk memilih semua font, Tekan shift terus klik / pilih font pertama dan terakhir dalam folder font yang anda ingin instal / pasang.
- Tarik font yang dipilih ke Folder Font yang sudah Terpasang.
- Klik tombol.
 Buat Grup Font Baru, folder akan muncul dalam daftar Grup Font.
 - Dalam New Font Groupt, Beri nama untuk kelompok font, dan tekan Masukkan. Anda dapat menambahkan font untuk grup dengan menyeret font dari Katalog Font. Anda dapat menginstal font dengan menyeret font yang anda inginkan ke daftar Font yang sudah terinstal / terpasang.
- Lakukan salah satu Cara berikut:
- Untuk melihat format font , klik tombol
 , dan pilih OpenType, PostScript Type 1, Atau TrueType.
 - Untuk melihat menurut Style font, klik tombol
 , dan memilih pilihan font style.
- Untuk melihat format font , klik tombol
- Dalam Font Catalog , klik font untuk melihat pratinjau. Preview font Akan muncul dalam daftar Contoh:
Sumber Rujukan : www.corel.com
Rating: 5
Rekomendasi Artikel :
"Ultrabook Notebook Tipis Harga Murah Terbaik"
"Sepeda Motor Injeksi Irit Harga Terbaik Cuma Honda"
Thursday, March 24, 2011
Playing in 3D?
I was reading a review of the Nintendo 3DS, the new handheld console with 3D capability. The reviewer said that the 3D effects were nice as long as you held the console very still, but that if you played for example in a moving bus, or your mashing buttons moved the console a bit too much, the 3D effect was lost, and you got a blurry double picture instead.
Technical problems apart, I'm not quite sure about the advantages of playing in 3D. Has anyone of you already tried it? Do you think this is the future of video gaming, or is it just a fad that will pass?
Technical problems apart, I'm not quite sure about the advantages of playing in 3D. Has anyone of you already tried it? Do you think this is the future of video gaming, or is it just a fad that will pass?
Wednesday, March 23, 2011
Mewarnai clipart di CorelDRAW
Jadilah kreatif dengan clipart CorelDRAW dengan mengubah warna nya! Hanya menyeret swatch warna untuk perubahan sederhana, atau menggunakan alat Isi untuk efek yang lebih rumit.
CorelDRAW Graphics Suite menyertakan banyak koleksi clipart untuk membantu Anda dengan proyek Anda. Untuk menyesuaikan clipart, Anda dapat mengubah warna nya. Seringkali, mengubah warna clipart semudah menyeret swatch warna dari palet warna standar, atau menerapkan mengisi dengan Interaktif Isi alat. Kadang-kadang, clipart berisi tertutup daerah, yang bisa diisi hanya dengan Smart Isi alat. Dalam kasus lain, Anda mungkin perlu mempersiapkan clipart dengan membuat jalan tertutup.

Original clipart (kiri); clipart dengan warna berubah (kanan)

Desain ini memiliki wilayah yang tertutup oleh objek: bagian dalam bentuk berlian dan loop (ditampilkan dalam inset atas pada tingkat zoom yang lebih besar). Daerah ini bisa diisi hanya dengan menggunakan alat Smart Fill.


Menyeret marquee sekitar jalur terbuka Keempat loop kecil ditutup dengan menggunakan Atur> Tutup Jalur> Terdekat Nodes dengan perintah garis melengkung. Kemudian, mereka penuh dengan menyeret sebuah swatch warna dari palet warna. - ( Baca Juga : Edit Foto di ACDsee )
Referensi : www.corel.com
CorelDRAW Graphics Suite menyertakan banyak koleksi clipart untuk membantu Anda dengan proyek Anda. Untuk menyesuaikan clipart, Anda dapat mengubah warna nya. Seringkali, mengubah warna clipart semudah menyeret swatch warna dari palet warna standar, atau menerapkan mengisi dengan Interaktif Isi alat. Kadang-kadang, clipart berisi tertutup daerah, yang bisa diisi hanya dengan Smart Isi alat. Dalam kasus lain, Anda mungkin perlu mempersiapkan clipart dengan membuat jalan tertutup.
Original clipart (kiri); clipart dengan warna berubah (kanan)
Untuk mengisi clipart dengan warna
- Corel Start CONNECT (Go to Start> Semua Program> CorelDRAW Graphics Suite Corel> CONNECT)
- Dalam Corel CONNECT, arahkan ke Content Perpustakaan CDGS dan memilih file yang Anda inginkan. Atau mencari file dengan menggunakan kata kunci dalam Cari bar di Corel CONNECT.

- Pilih file yang Anda inginkan dari jendela utama dalam Corel CONNECT dan klik Buka di CorelDRAW
- Tarik swatch warna pada palet warna pada layar ke bagian dari gambar yang ingin Anda warna, dan lepaskan tombol mouse ketika sebuah persegi diisi muncul dengan kursor
Untuk menggunakan alat Smart Isi
Dengan hanya menyeret swatch warna, Anda dapat objek warna dalam clipart. Jika Anda ingin ke area warna tertutup oleh benda-benda, namun Anda harus menggunakan Smart Isi alat.Desain ini memiliki wilayah yang tertutup oleh objek: bagian dalam bentuk berlian dan loop (ditampilkan dalam inset atas pada tingkat zoom yang lebih besar). Daerah ini bisa diisi hanya dengan menggunakan alat Smart Fill.
- Buka Smart alat flyout, dan klik Smart Isi alat.

Isi Smart alat terletak dalam kotak peralatan, di flyout Tools Smart. - Pada property bar, pilih salah satu pilihan berikut dari Isi Pilihan daftar kotak:
- Menentukan memungkinkan Anda memilih warna yang solid dari Warna Isi pemetik pada property bar.
- Gunakan default memungkinkan Anda menggunakan Pengaturan standar alat Isi. Tidak ada isi berlaku tidak mengisi ke daerah tersebut.
- Menentukan memungkinkan Anda memilih warna yang solid dari Warna Isi pemetik pada property bar.
- Pilih salah satu opsi berikut dari Garis Besar pilihan kotak:
- Gunakan default memungkinkan Anda menerapkan pengaturan garis default.
- Menentukan memungkinkan Anda memilih lebar baris dari Garis Besar Lebar kotak dan warna garis dari Garis Warna pemilih.
- Tidak ada garis tidak berlaku garis ke daerah tersebut.
- Gunakan default memungkinkan Anda menerapkan pengaturan garis default.
- Klik di dalam area tertutup yang Anda ingin mengisi. Sebuah objek yang baru dibuat dari daerah tertutup, dan mengisi saat ini dan gaya garis diterapkan untuk itu. Objek baru muncul di atas benda-benda yang ada di lapisan.

Desain diisi dengan warna
Untuk membuat jalur tertutup di clipart
Clipart berisi objek kurva yang terdiri dari komponen yang disebut jalan. Sebuah jalan mungkin terbuka (misalnya, baris) atau tertutup (misalnya, elips). Anda dapat menambahkan warna ke bagian dalam jalan tertutup. Untuk menerapkan mengisi ke jalur terbuka, seperti baris, Anda harus terlebih dahulu bergabung memulai dan mengakhiri node membentuk suatu jalur tertutup. Pada contoh di bawah ini, empat loop kecil di desain tidak bisa diisi dengan menyeret sebuah swatch warna ataupun dengan menggunakan Smart Isi alat. Seorang yang lebih tinggi menunjukkan tingkat zoom bahwa loop tidak jalan tertutup dan tidak sepenuhnya tertutup. Untuk mengisi loop, tertutup jalan perlu dibuat terlebih dahulu.- Pilih clipart seluruh di jendela menggambar, dan tekan Ctrl + U untuk ungroup itu.
- Menggunakan Memilih tool, drag marquee di sekitar wilayah dengan sebuah jalur terbuka sambil menahan Alt.
Menyeret marquee sekitar jalur terbuka
- Klik Mengatur > Tutup Jalur, Dan pilih perintah.
Sekarang jalan ditutup, Anda dapat mengisinya dengan warna.
Referensi : www.corel.com
Edit Foto di ACDsee
Edit Foto di ACDsee kini dilengkapi fitur editor untuk mengutak-atik fike gambar dan foto. Fitur editor ini bisa diakses baik melalui tampilan browser maupun viewer nya.
Tampilan browser-nya bisa kita akses dengan mengklik menu “tools > Open in editor > ACDsee” atau klik kanan pada gambar tersebut dan memilih menu “edit”. Pada tampilan viewer, kita bisa mengakses klik menu “modify > edit mode”. Kita pun masuk pada fitur editor pada ACDsee.
Pada fitur editor ini terdapat 11 perangkat untuk menyuting file gambar. Exposure, Color, red eye, photo repair, sharpness, noise, resize, crop,rotate, effects, dan add text.Exposure
Fasilitas ini digunakan untuk memperbaiki pencahayaan pada file gambar. Jika gambar tampak terlalu gelap, kita bisa membuatnya lebih terang. Begitu pula sebaliknya. Selain itu kita bisa mengatur tingkat kontras.
Color
Fasilitas berfungsi menyesuaikan dan mengatur warna yang terkandung pada gambar. Melalui tool ini juga menambah atau mengurangi corak warna pada gambar. Kalau tampak kemerah – merahan, kita bisa mengurangi corak warna merah.
Red eye
Adakalanya hasil foto terlihat agak aneh. Orang yang menjadi obyek foto tampak berwarna merah menyala. Fasilitas red eye pada ACDsee berfungsi mengurangi mata merah tersebut.
Photo repair
Tool ini berfungsi masalah pada foto. Ada dua didalamnya, heal dan clone, heal untuk susunan fiksel dari area asal ke sasaran, dan menyatukan susunan dengan warna di daerah sasaran.
Sharpness
Kita bisa menggunakan sharpness untuk meningkatkan dan mengurangi perbedaan warna pada piksel-piksel yang saling berdekatan. Ini untuk membuat gambar menjadi lebih tajam atau lebih kabur.
Noise
Fasilitas berguna untuk menambah menghilangkan efek ‘noda’ pada gambar yang di olah jika kita menambahkan noda. Pada gambar akan butiran butiran di bagian tertentu. Jika menghilangkan noda, gambar tampak lebih halus dan bersih.
Resize
Namanya, langsung tau fasilitas berfungsi ulang ukuran gambar kita olah. Kita lakukan berdasarkan untuk piksel maupun presantase. Berimbas pada ukuran file, kualitas sebagai file terbaru.
Crop
Fungsi berguna untuk mengambil area dari sebuah gambar. Misalnya, tangan kanan saja sebuah gambar seluruh sebuah gambar close up. Hasil cropping bisa kita simpan sebagai file baru.
Rotate
Memutar gambar secara maupun perputaran bisa kita atur horisontal. Perputaran kita atur berdasarkan derajat. Selain gambar, dalam fasilitas gambar. Dengan fungsi flip, yang kiri menjadi kanan.
Effects
Add Text.Kita juga bisa menambahkan tulisan pada gambar. Fungsi ini disertai dengan pilihan pont yang ter-instal pada Windows. Selain itu terdapat pula pengaturan berupa efek gelembung dialog yang membuat gambar solah ‘berbicara’. Efek ini membuat gambar tersebut mirip tampilan dalam komik. - ( Baca Juga : hasil maksimal dari CorelDRAW )
Tampilan browser-nya bisa kita akses dengan mengklik menu “tools > Open in editor > ACDsee” atau klik kanan pada gambar tersebut dan memilih menu “edit”. Pada tampilan viewer, kita bisa mengakses klik menu “modify > edit mode”. Kita pun masuk pada fitur editor pada ACDsee.
Pada fitur editor ini terdapat 11 perangkat untuk menyuting file gambar. Exposure, Color, red eye, photo repair, sharpness, noise, resize, crop,rotate, effects, dan add text.Exposure
Fasilitas ini digunakan untuk memperbaiki pencahayaan pada file gambar. Jika gambar tampak terlalu gelap, kita bisa membuatnya lebih terang. Begitu pula sebaliknya. Selain itu kita bisa mengatur tingkat kontras.
Color
Fasilitas berfungsi menyesuaikan dan mengatur warna yang terkandung pada gambar. Melalui tool ini juga menambah atau mengurangi corak warna pada gambar. Kalau tampak kemerah – merahan, kita bisa mengurangi corak warna merah.
Red eye
Adakalanya hasil foto terlihat agak aneh. Orang yang menjadi obyek foto tampak berwarna merah menyala. Fasilitas red eye pada ACDsee berfungsi mengurangi mata merah tersebut.
Photo repair
Tool ini berfungsi masalah pada foto. Ada dua didalamnya, heal dan clone, heal untuk susunan fiksel dari area asal ke sasaran, dan menyatukan susunan dengan warna di daerah sasaran.
Sharpness
Kita bisa menggunakan sharpness untuk meningkatkan dan mengurangi perbedaan warna pada piksel-piksel yang saling berdekatan. Ini untuk membuat gambar menjadi lebih tajam atau lebih kabur.
Noise
Fasilitas berguna untuk menambah menghilangkan efek ‘noda’ pada gambar yang di olah jika kita menambahkan noda. Pada gambar akan butiran butiran di bagian tertentu. Jika menghilangkan noda, gambar tampak lebih halus dan bersih.
Resize
Namanya, langsung tau fasilitas berfungsi ulang ukuran gambar kita olah. Kita lakukan berdasarkan untuk piksel maupun presantase. Berimbas pada ukuran file, kualitas sebagai file terbaru.
Crop
Fungsi berguna untuk mengambil area dari sebuah gambar. Misalnya, tangan kanan saja sebuah gambar seluruh sebuah gambar close up. Hasil cropping bisa kita simpan sebagai file baru.
Rotate
Memutar gambar secara maupun perputaran bisa kita atur horisontal. Perputaran kita atur berdasarkan derajat. Selain gambar, dalam fasilitas gambar. Dengan fungsi flip, yang kiri menjadi kanan.
Effects
Fasilitas editor ACDsee juga meliputi sejumlah efek untuk membuat gambar tampak benar-benar berbeda dari wujud aslinya. Beberapa efek adalah tampilan efek riak gelombang, sepia, poster, dan lukisan cat minyak. Pilihan efek di sini kira-kira hampir sama dengan efek-efek Adobe Photoshop.
Add Text.
selamat mencoba Edit Foto di ACDsee
Death of the raid model
MMO Melting Pot has a post about raid guild burnout and asks whether WoW is dying. That is revealing insofar as it equates World of Warcraft with its raiding endgame. As I happen to be married to someone who managed to play 6 years of WoW without ever setting foot into a raid dungeon, I can assure you that WoW and raiding are not the same. The raid endgame is just a subset of the game of World of Warcraft.
And that particular subset of the game certainly has problems. It is increasingly self-contained, that is the only use for the rewards of raiding is getting access to more raids. Raiding also has the biggest social problems of all the sub-games of WoW, because on the one side people are forced to rely on each other, but that on the other side leads to a strong segregation along the levels of virtual power. And raiding has the big problem that on the one side it is supposed to be the endgame goal for everybody, but on the other side the people who are raiding would like their activity to be exclusive.
But ultimately all comes down to a problem of simple mathematics: In a game like World of Warcraft where expansions are released only every two years, but offer only at best two months of leveling, people spend a huge amount of time in the endgame. If you raid X times per week for 100 weeks, and there are Y raid boss challenges in the game, you will need to spend (X * 100) / Y raid nights wiping on each boss if you want the challenge to last until the end. If you advance faster, you'll find yourself in a situation where there is no new raid boss to kill left before the next major content patch. If you advance slower, you never make it through. Because Blizzard can't offer hundreds of raid bosses, by definition you spend more raid nights wiping than progressing. Take all that together, and at some point you realize that you are working hard, under frequent frustration, with the reward being some even more frustrating content being made available to you.
Blizzard's decision in Cataclysm to reverse their Wrath of the Lich King "raiding is for everybody" policy, and to instead reinstate the "raiding is for the leet" game design isn't exactly helping. A much better design would have offered easier heroics and an easy entry-level raid dungeon, and then made the further raid dungeons harder. While advancing slowly or getting stuck can be frustrating, that is nothing compared with the frustration of not even getting a foot in the door. The average player today has problems even getting accepted into a BoT trash run, with the very existence of "trash runs" telling you a lot about the state of Cataclyms raiding.
Further contributing to the death of the raid model in World of Warcraft is the inconsistency in game design: While making raiding harder, Blizzard made the rest of the game easier. Even my casually playing wife is complaining that she is leveling *too fast*. And the lower level game appears to have been changed from "kill 10 foozles" to "just show up where the foozles are, and they will die on their own from a heart attack when seeing your overly powerful character".
Blizzard will need to decide whether they are making a game for everybody, and that would have to include letting everybody play in the endgame as well; or whether they are making a game in which the leveling game teaches you the skills necessary for the endgame, and that would mean making the leveling game less trivial. The current model with its stark contrast between trivial leveling game for the masses and raid endgame for the leet just isn't going to keep World of Warcraft running for the remaining 20 months of Cataclysm. But it won't be WoW that is dying, but just the raid endgame, which will become increasingly seen as a detached activity for a small minority of no-lifers, and not worthy of sustained investment.
Tuesday, March 22, 2011
The Sims Medieval
Sometimes I like to play one of The Sims games. So when I read that The Sims Medieval was released yesterday, and was somewhere between a Sims game and a RPG, I was obviously interested. The only thing that stopped me from impulse-buying it was the strange release-schedule in which Europe has to wait two days longer for the game. On the upside that gives me time to read the first reviews of The Sims Medieval before I buy it. Has anyone of you already played it? Is it any good?
Hasil maksimal dari CorelDRAW
Apakah Anda perlu untuk memindahkan ukuran atau menyelaraskan objek dan teks dalam proyek Anda, Anda dapat menyelesaikan tugas di tangan dengan presisi menggunakan Rulers yang tersedia di CorelDRAW ®. Rulers terdiri dari sebuah bar bar vertikal dan horisontal. Kedua bar yang ditandai dalam unit dan ditampilkan secara default di sudut kiri atas jendela gambar.

Rulers ditampilkan dalam CorelDRAWBila Anda memindahkan penunjuk di jendela menggambar, Rulers menemukan posisi pointer dalam kaitannya dengan asal mereka. Asal Rulers adalah titik pada halaman gambar yang sesuai dengan poin ditandai dengan nol pada kedua Rulers. Secara default, asal Rulers terletak di sudut kiri bawah dari halaman gambar. Posisi penunjuk akan ditampilkan pada status bar, yang berguna ketika Anda perlu menggunakan presisi dalam menyeret objek ke posisi baru.
 Tips berikut dapat membantu Anda mendapatkan Hasil maksimal dari Rulers di CorelDRAW.

Memindahkan Rulers
halaman Rulers di kotak dialog PilihanUntuk informasi rinci tentang penggunaan Tool Rulers dan tata letak lainnya, berkonsultasi "Bekerja dengan tata letak halaman dan tool" dalam file Bantuan CorelDRAW
- ( Baca Juga : Mengisi objek dengan warna di CorelDRAW )
Sumber Rujukan : www.corel.com
Rating: 5
Rulers ditampilkan dalam CorelDRAW
- Untuk menampilkan atau menyembunyikan Rulers, klik View> Rulers.
- Untuk memindahkan penggaris, tahan Shift, dan tarik penggaris ke posisi baru. Perhatikan bahwa Rulers bergerak dari Rulers sebelumnya.
- Untuk memindahkan kedua Rulers pada saat yang sama, tekan terus Shift, dan drag titik persimpangan dari dua Rulers tersebut.
Memindahkan Rulers
- Untuk kembali Rulers ke posisi semula, tekan terus Shift, dan klik dua kali Rulers.
- Untuk menyesuaikan pengaturan Rulers, klik dua kali penggaris, dan tentukan pengaturan yang Anda inginkan pada halaman Rulers dari kotak dialog Opsi. Sebagai contoh, Anda dapat mengubah unit pengukuran dari inci ke milimeter atau sentimeter. Perhatikan bahwa unit pengukuran yang digunakan untuk Rulers berlaku ke daerah lain, termasuk ukuran halaman dan objek, duplikat jarak, dan nilai-nilai menyenggol, kecuali jika Anda menonaktifkan unit Sama untuk jarak Duplikat, Sikut dan Rulers, dan unit yang sama, untuk posisi Rulers Horisontal dan Vertikal centang pada kotak dialog Rulers, setiap perubahan yang Anda buat untuk unit Rulers 'pengukuran akan berlaku untuk tool lainnya.
Anda juga dapat mengubah asal Rulers dan menentukan berapa banyak tanda muncul antara nilai pada Rulers.
halaman Rulers di kotak dialog Pilihan
- ( Baca Juga : Mengisi objek dengan warna di CorelDRAW )
Sumber Rujukan : www.corel.com
Rating: 5
An insult to my readers
Every week I get e-mails from various companies which found my blog via it's Google Pagerank, who want me to promote their wares. Yesterday I got a mail suggesting that my readers would certainly be interested in that company's Farmville guide (not going to give you the link). What an insult! I would most certainly hope that my readers are sufficiently intelligent to play Farmville without a guide, if they play it at all.
But then this got me thinking that a Farmville guide is actually somewhat symptomatic of modern gaming. There is even a Farmville for Dummies book in print, so apparently enough people buy such guides. There are whole publishing companies producing nothing but guides for video games. And that is just the most commercial tip of the iceberg, the internet is a huge repository for game guides, wikis, databases, and even videos explaining you how to play every step of every video game there is.
In general, playing a game consists of two major parts: Figuring out what move to make, and executing the move. With games being played by many thousands, sometimes millions of people, and communication via the internet being so easy, players crowdsource that first part. And there are some good reasons for it: Imagine you bought a game, and got stuck at some point, because you can't figure out how to proceed further. Looking up the solution on the internet is obviously better than never playing the second half of the game.
The obvious danger is using guides all the time, and never even trying to figure out how by yourself how a game works and what to do in it. That reduces playing a game to pure execution. Now obviously there are games in which the execution is the fun part, but that is hardly the case for Farmville. Even MMORPGs, apart from the endgame, are mostly trivial in execution. Figuring out the virtual world is the fun part, and outsourcing that fun to databases and addons leaves us with nothing much.
But not only is there a trend towards game guides, but games more and more incorporate those guides into the game itself. In a way the quest systems of most MMORPGs are nothing more than a big pointer showing people the way towards the next suitable loot pinata. It avoids players exploring the virtual world on their own, and god forbid accidentally stumble into a higher level zone and getting killed.
The most surprising part of this is that the community *wants* all these guides and aids and crutches. You'd be laughed at in your guild if you proposed to do a raid without looking up the boss strategies first, or to try raiding without addons. People would consider it strange if a player would just go out and explore the virtual world, killing monsters without having a quest for them. In a community where the virtual reward for playing is considered more important than the fun you have by playing, it is considered normal to deliberately use tools and aids that diminish the fun to get to the virtual rewards faster. It is the players who write the addons and contribute to the databases and guides that make our games so trivial now. It is hard to blame developers for making games too trivial, if the players then go and further trivialize those games with guides and mods.
Monday, March 21, 2011
Real tanking
One of the subjects that pops up regularly in the MMORPG blogosphere is that of the holy trinity, the combat system based on tanks, healers, and damage dealers. Many people have grown dissatisfied with that system, so frequently there are blog posts with various ideas of improvement, or ideas how MMORPGs could abandon that system. I was playing a turn-based fantasy strategy game this weekend (Fantasy Wars), and that made me think how "tanking" worked in strategy games, in reality, and in MMORPGs. And I think that tells us a lot about the holy trinity.
In Fantasy Wars you have some units you don't want to get hit, like archers, or a healing priest, or a mage. So what you do is to build a wall of heavy infantry units (tanks) in front, and because these units have a zone of control, and enemies can't simply pass through, the enemy is forced to attack the tanks and not the squishy units behind. Your wall needs to be wide enough so that the enemy doesn't have enough movement points to simply run around it. While still a game, and thus not totally realistic, this is a lot more similar to a real battle with infantry in the front and archers in the back than the MMORPG system.
In MMORPGs with the holy trinity system, a tank fulfils the same basic function: Standing in between the enemy and the squishier group members. But he doesn't do that by (virtually-)physically standing between the two. In fact in many MMORPGs characters and monsters can run through each other, there is no collision control, and there is certainly no zone of control hindering enemies movements. Furthermore movement in MMORPGs tends to be unrealistically fast and agile: It is pretty certain that a knight in shining armor would have considerable difficulties to "circle strafe" in real life at the same speed that characters do that in video games. Thus with movement being too fast and unhindered, the tank cannot stop the enemy by positioning himself in front of the healer or mage.
What a MMORPG tank does instead is "taunting". Apparently nearly every enemy in a MMORPG, from a mindless slime to the Lich King himself, will always attack the guy telling the "yo mamma" jokes. Even if he is currently right next to a squishy, high-danger target, while the tank is deals less damage and is harder to hit.
Even if we explain away the "taunting" as some sort of magical mind control, there remains a major difference between tanking in a strategy game or real life and tanking in a MMORPG: The ratio of tanks to squishies. In a MMORPG you can have one tank protecting 3 mages and a priest, even against multiple enemies. That obviously wouldn't work if he had to stand between the enemy and the other group members. For a more realistic tanking situation your group would more likely have 3 tanks, 1 mage, and 1 priest. Or in a larger group 5 tanks, and 2-3 mages and priests each. Unless all your dungeons are narrow corridors, where one or two tanks can completely block the way, you'd need about half of your group as tanks if tanks would work by standing between monsters and the rest of the group.
While this sounds very much like a completely hypothetical and theoretical exercise, there is nevertheless one lesson to be learned here. By having gone from a war or war game situation with multiple tanks to a MMORPG situation with only a single tank, the responsability for tanking has become extremely concentrated onto a single person in groups and even raids (the "main tank"). The tank is held responsible for aggro control, up to the point where in a pickup group some dps unable to reliably target the mob with the skull floating over his head or to use /assist will *still* blame the tank if a mob attacks him. Or blame the healer of course, another case of all the responsability for one function concentrated onto one character in a not very realistic way.
Thus while I am not offering a different system than the holy trinity here, I can very much offer a basic condition for a different system to work better than the current one: Responsability has to be better and clearer shared between the group members. Maybe some multi-tank system with slower movement, collision control, and zones of control would work, but we appear not to be quite there yet from a technical point of view.
Mengisi objek dengan warna di CorelDRAW
Anda dapat menggunakan palet warna default di CorelDRAW ® untuk mengisi objek dengan warna dengan cepat dan mudah. Palet warna standar berisi warna dari model warna CMYK dan terletak di sepanjang sisi kanan jendela program.

Menyeret swatch warna objek
Objek diisi dengan warna
Seorang pemetik pop-up warna
Atau, Anda dapat mengisi objek dengan menggunakan alat pipet bersama-sama dengan alat Paintbucket
  , Alat yang Isi
  , Interactive Fill tool
  , Atau alat Interaktif Mesh Fill
  . Anda juga dapat mengisi tumpang-tindih objek dengan menggunakan alat Smart Isi
  . Untuk informasi lebih lanjut tentang alat ini, lihat menu Bantuan CorelDRAW.
- ( Baca Juga : Menggambar bentuk dasar dengan CorelDRAW )
Referensi : www.corel.com
- Untuk mengisi objek dengan warna, menyeret swatch warna dari palet warna untuk objek.
Menyeret swatch warna objek
Objek diisi dengan warna
- Untuk mengubah warna mengisi atas objek yang dipilih, klik contoh warna.
- Untuk mengubah warna garis besar dari objek yang dipilih, klik kanan contoh warna.
- Untuk memilih dari berbagai berbagai nuansa warna, klik dan tahan swatch warna untuk menampilkan pop-up pemetik warna, kemudian klik warna.
Seorang pemetik pop-up warna
- Untuk menghapus mengisi, klik tombol No Isi
 di bagian atas palet warna.
 - Untuk memperluas palet warna, klik panah flyout di bagian bawah palet.
Atau, Anda dapat mengisi objek dengan menggunakan alat pipet
bersama-sama dengan alat Paintbucket , Alat yang Isi , Interactive Fill tool , Atau alat Interaktif Mesh Fill . Anda juga dapat mengisi tumpang-tindih objek dengan menggunakan alat Smart Isi . Untuk informasi lebih lanjut tentang alat ini, lihat menu Bantuan CorelDRAW.- ( Baca Juga : Menggambar bentuk dasar dengan CorelDRAW )
Referensi : www.corel.com
Menggambar bentuk dasar dengan CorelDRAW
Dengan CorelDRAW ®, bentuk dasar menggambar - seperti :
cepat dan mudah. Semua tool yang Anda butuhkan dengan mudah diakses dari flyouts berikut ini di barisan kotak Tool : Rectangle Tool, Ellipse Tool, dan Polygon Tool.
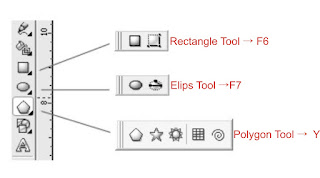
flyout Rectangle tool, flyout Ellipse tool, dan flyout Polygon tool
Menggambar empat persegi panjang dan bujur sangkar
Anda dapat menggambar persegi panjang atau persegi dengan menyeret diagonal dengan Rectangle Tool atau dengan menentukan lebar dan tinggi dengan rectangle tool 3 titik. Anda akan menemukan 3 point rectangle tool yang sangat berguna untuk membuat persegi panjang di sudut. Kedua alat-alat yang terletak di flyout Rectangle Tool .

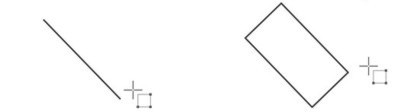
Menggambar persegi panjang di sudut dengan rectangle tool 3 titik
Anda dapat menggambar elips atau lingkaran dengan menyeret diagonal dengan alat Ellipse, atau Anda dapat menggambar elips dengan menggunakan alat 3 titik elips untuk menentukan lebar dan tinggi. 3 titik tool elips memungkinkan Anda dengan cepat membuat sebuah elips di sudut, sehingga tidak harus memutar objek elips. Kedua tool yang terletak di flyout Ellipse.
 Setelah Anda menggambar elips atau lingkaran, Anda bisa dengan mudah mengubahnya ke dalam bentuk kue atau busur.
Kiri ke kanan: lingkaran, bentuk kue, dan busur
Menggambar elips di sudut dengan alat elips 3 titik
Kiri ke kanan: lingkaran, bentuk kue, dan busur
Menggambar poligon dan bintang-bintang
Anda dapat menggambar poligon dan dua jenis bintang bintang keren, yang memiliki penampilan bintang tradisional dan bintang-bintang kompleks, yang memiliki sisi berpotongan. Dengan bintang yang sempurna, Anda dapat menerapkan dengan mengisi bentuk seluruh bintang.contoh di bawah ini :

Kiri ke kanan: poligon, bintang yang sempurna, dan bintang kompleksTool yang Anda butuhkan untuk membuat poligon dan bintang-bintang yang terletak di flyout Objek.

Sumber Rujukan : www.corel.com
Rating: 5
cepat dan mudah. Semua tool yang Anda butuhkan dengan mudah diakses dari flyouts berikut ini di barisan kotak Tool : Rectangle Tool, Ellipse Tool, dan Polygon Tool.
flyout Rectangle tool, flyout Ellipse tool, dan flyout Polygon tool
Menggambar empat persegi panjang dan bujur sangkar
Anda dapat menggambar persegi panjang atau persegi dengan menyeret diagonal dengan Rectangle Tool atau dengan menentukan lebar dan tinggi dengan rectangle tool 3 titik. Anda akan menemukan 3 point rectangle tool yang sangat berguna untuk membuat persegi panjang di sudut. Kedua alat-alat yang terletak di flyout Rectangle Tool .
- Untuk menggambar persegi panjang, buka flyout Rectangle, klik tool Rectangle
 , Dan seret di jendela gambar sampai persegi panjang adalah ukuran yang Anda inginkan.
 - Untuk menggambar kotak, klik Rectangle tool, dan tekan tombol Ctrl, lalu tarik dalam jendela gambar sampai membentuk kotak persegi yang Anda inginkan.
- Untuk menggambar sebuah persegi panjang di sudut, klik rectangle tool 3 titik
 . Pada jendela gambar, arahkan ke mana Anda ingin mulai segi empat, drag untuk menggambar lebar, dan lepaskan tombol mouse. Pindahkan pointer untuk menggambar tinggi, dan klik.
Menggambar persegi panjang di sudut dengan rectangle tool 3 titik
- Anda dapat menggambar persegi panjang dari pusat keluar dengan menekan Shift yang Anda tarik dengan Rectangle tool.
- Anda dapat menggambar persegi dari pusat luarnya dengan menahan tombol Shift + Ctrl yang Anda tarik dengan Rectangle tool.
- Anda dapat menggambar persegi panjang yang mencakup halaman gambar dengan mengklik dua kali tool Rectangle.
Anda dapat menggambar elips atau lingkaran dengan menyeret diagonal dengan alat Ellipse, atau Anda dapat menggambar elips dengan menggunakan alat 3 titik elips untuk menentukan lebar dan tinggi. 3 titik tool elips memungkinkan Anda dengan cepat membuat sebuah elips di sudut, sehingga tidak harus memutar objek elips. Kedua tool yang terletak di flyout Ellipse.
Kiri ke kanan: lingkaran, bentuk kue, dan busur
- Untuk menggambar elips, buka flyout Ellipse, klik tool Ellipse
 , Dan tarik di mana Anda ingin tempat itu. Menahan Ctrl sambil menyeret dengan alat Ellipse menarik lingkaran, sambil menahan tombol Shift menarik elips dari pusat.
 - Untuk mengubah elips menjadi bentuk pie atau arc, klik tombol Pie
 atau tombol Arc
  pada property bar.
 - Untuk menggambar elips di sudut, klik alat elips 3 titik
 , Dan tarik dalam jendela gambar untuk menggambar elips tengah di sudut yang Anda inginkan. Selanjutnya, memindahkan pointer untuk menentukan ketinggian elips, dan klik.
Menggambar elips di sudut dengan alat elips 3 titik
Kiri ke kanan: lingkaran, bentuk kue, dan busur
Menggambar poligon dan bintang-bintang
Anda dapat menggambar poligon dan dua jenis bintang bintang keren, yang memiliki penampilan bintang tradisional dan bintang-bintang kompleks, yang memiliki sisi berpotongan. Dengan bintang yang sempurna, Anda dapat menerapkan dengan mengisi bentuk seluruh bintang.contoh di bawah ini :
Kiri ke kanan: poligon, bintang yang sempurna, dan bintang kompleks
- Untuk menggambar poligon, buka flyout Objek, klik tool Polygon
 , Dan seret di jendela gambar sampai poligon terbentuk dengan ukuran yang Anda inginkan. Anda dapat menggambar poligon dari titik pusatnya dengan menekan Shift lalu Anda tarik. Juga, Anda dapat menggambar poligon simetris dengan menahan tombol Ctrl.
 - Untuk menggambar sebuah bintang yang sempurna, klik tool Star
 , Dan seret di jendela gambar sampai bintang terbentuk dengan ukuran yang Anda inginkan.
 - Untuk menggambar bintang kompleks, klik tool bintang Kompleks
 , Dan seret di jendela gambar sampai bintang terbentuk dengan ukuran yang Anda inginkan.
Sumber Rujukan : www.corel.com
Rating: 5
Sunday, March 20, 2011
Mengimpor Adobe ® Illustrator ®, Adobe Photoshop ® dan PDF file di corelDraw
CorelDRAW ® memberikan peningkatan dukungan untuk terbaru Adobe ® Illustrator ® (AI) CS 4, Portable Document Format (PDF) file dan Adobe ® Photoshop ® (PSD) CS 4 format file. Sekarang lebih mudah untuk terbuka, impor, dan mengedit file dalam format ini. Beberapa perangkat tambahan yang penting meliputi:

Kursor impor menunjukkan nama file dan
dimensi dari file yang akan Anda impor.Adobe Illustrator grafis yang diimpor ke dalam program sebagai sekelompok objek. Klik > Atur Ungroup untuk memanipulasi objek dalam grafis impor.

Impor kotak dialog PDF
Bila Anda mengimpor multipage PDF, kotak dialog PDF Impor memperluas untuk membiarkan Anda memilih apa halaman untuk diimpor.
- dukungan untuk PDF / A dan Acrobat 9 (PDF 1.7) file format & Bates penomoran
- dukungan untuk mendefinisikan ukuran halaman dengan objek selama PDF ekspor
- CorelDRAW X5 menjaga penampilan lapisan penyesuaian dan efek palet Masker file PSD diimpor
- dukungan untuk artboards beberapa AI, pelestarian transparansi gradien, stroke gumpalan kuas dan bagian preflight baru
- Corel PHOTO-PAINT ® X5 mempertahankan Vibrance diedit, grayscale, dan lensa kamera filter file PSD impor dan ekspor
Untuk mengimpor Adobe Illustrator (AI) atau Adobe Photoshop (PSD) file
Anda dapat mengimpor seluruh file AI & PSD termasuk CS 4 file. Untuk file yang tersimpan dalam Adobe Illustrator CS atau lebih tinggi, teks dapat diimpor sebagai teks atau kurva jika file PDF-kompatibel. Jika file tidak PDF-kompatibel, Anda harus terlebih dahulu mengubah teks semua untuk menguraikan dengan menggunakan > Ketik Buat Garis perintah di Adobe Illustrator untuk teks yang akan diimpor.- Klik File> Impor.
- Cari folder di mana file tersebut disimpan.
- Pilih AI - Adobe Illustrator dari File dari tipe daftar kotak.
- Klik nama file, dan klik Impor.
Jika anda mengimpor file PDF-kompatibel berisi teks, Impor PDF kotak dialog muncul. Dalam Impor teks sebagai daerah, memungkinkan Teks atau Kurva pilihan. Jika Anda tidak yakin pilihan untuk memilih, lihat Untuk mengimpor file PDF.
Bila Anda mengimpor teks sebagai teks, Font substitusi untuk hilang font kotak dialog muncul jika Anda tidak memiliki semua font yang digunakan dalam file diinstal. Pilih pengaturan yang Anda inginkan, dan klik OK. - Ketika kursor impor muncul, lakukan salah satu berikut ini:
- Klik halaman gambar untuk mempertahankan berkas asli dan sudut posisi teratas kiri di mana Anda klik.
- Klik dan drag pada halaman gambar untuk mengubah ukuran file. Kursor impor menampilkan dimensi dari file diubah ukurannya yang Anda tarik di
gambar halaman. - Tekan Masukkan ke pusat file pada halaman gambar.
- Klik halaman gambar untuk mempertahankan berkas asli dan sudut posisi teratas kiri di mana Anda klik.
Kursor impor menunjukkan nama file dan
dimensi dari file yang akan Anda impor.
Untuk mengimpor file PDF
Anda bisa mendapatkan hasil yang terbaik untuk teks dalam dokumen PDF dengan memilih untuk mengimpor teks sebagai teks atau sebagai kurva. Pointer berikut akan membantu Anda membuat pilihan yang tepat:- Ketika teks diimpor sebagai teks, font dan teks yang diawetkan, dan teks sepenuhnya dapat diedit sebagai teks artistik atau paragraf. Namun, beberapa efek dan format bisa hilang. Opsi ini disarankan jika Anda memiliki sebuah file PDF yang berisi blok besar teks, seperti newsletter, dan Anda ingin memformat teks atau menambahkan konten teks.
- Ketika teks diimpor sebagai kurva, tampilan teks, termasuk semua efek yang diterapkan untuk itu, yang diawetkan, dan setiap huruf dikonversi menjadi obyek kurva. Dengan opsi ini, fitur format teks tidak bisa lagi digunakan untuk mengedit teks. Jika anda memiliki sebuah file PDF yang mengandung sejumlah kecil teks yang tidak memerlukan editing, atau jika Anda tidak memiliki font yang digunakan dalam file PDF, Anda harus mengimpor teks sebagai kurva.
- Tekan Ctrl + I.
- Cari folder di mana file tersebut disimpan.
- Pilih PDF - Adobe Portable Document Format dari File dari tipe daftar kotak.
- Klik nama file, dan klik Impor.
Jika file yang dilindungi oleh password, ketik password yang valid dalam Password kotak. - Dalam Impor PDF kotak dialog, pilih salah satu opsi berikut di Impor teks daerah:
- Teks - Memungkinkan Anda mengedit dan memformat teks dari file PDF. Jika salah satu font yang digunakan dalam file PDF yang hilang, memilih pengaturan yang Anda inginkan dalam Font substitusi untuk hilang font kotak dialog, dan klik OK.
- Kurva - Mengkonversi teks ke kurva, membiarkan Anda menjaga penampilan teks asli
- Teks - Memungkinkan Anda mengedit dan memformat teks dari file PDF. Jika salah satu font yang digunakan dalam file PDF yang hilang, memilih pengaturan yang Anda inginkan dalam Font substitusi untuk hilang font kotak dialog, dan klik OK.
Impor kotak dialog PDF
Jika Anda mengimpor dokumen multipage, pilih halaman yang ingin Anda impor, dan klik OK.
Bila Anda mengimpor multipage PDF, kotak dialog PDF Impor memperluas untuk membiarkan Anda memilih apa halaman untuk diimpor.
- Ketika kursor impor muncul, klik halaman gambar.
Anda juga dapat mengklik dan drag untuk mengubah ukuran file, atau tekan Masukkan untuk menempatkan file di tengah dokumen.
PowerClip™ vs.Crop tool di CorelDRAW
CorelDRAW ® memberi Anda dua cara untuk memotong obyek vektor atau gambar bitmap. Anda dapat dengan cepat menghapus area yang tidak diinginkan dalam objek dan grafis yang diimpor dengan menggunakan alat Potong. Anda juga dapat menempatkan obyek vektor dan bitmap, seperti foto, di dalam benda lain atau wadah dengan menggunakan fitur PowerClip ™. Objek ditempatkan di dalam wadah mengambil bentuk wadah.

Crop tool memungkinkan Anda Crop wilayah persegi panjang.

Artistik teks dan sebuah bitmap sebelum menjadi objek PowerClip.
Di objek PowerClip, teks artistik wadah, dan bitmap bentuk isinya. bitmap ini berbentuk huruf dari teks artistik.
Menggunakan Crop tool
Ketika crop objek, anda mendefinisikan suatu area persegi (Crop area) yang ingin Anda simpan. Obyek bagian luar area Crop akan dihapus. Anda dapat menentukan posisi yang tepat dan ukuran dari area Crop, dan Anda dapat memutar dan mengubah ukurannya. Anda juga dapat menghapus area Crop.Untuk memotong objek dengan menggunakan alat Tanaman
- Pilih objek yang ingin Anda panen.
Jika tidak ada objek pada halaman gambar yang dipilih, semua objek yang dipotong. - Buka tool flyout Crop
 , Dan klik Crop tool
  .
. - Tarik untuk mendefinisikan area Crop .
Untuk memutar area Crop, klik di area Crop, dan memindahkan rotasi sudut menangani .
. - Double-klik di dalam area Crop.
Crop tool memungkinkan Anda Crop wilayah persegi panjang.
Menggunakan ™ PowerClip
Sebuah kontainer di CorelDRAW bisa objek apapun - misalnya, teks artistik atau persegi panjang. Bila Anda menempatkan benda ke dalam wadah yang lebih besar dari wadah, objek, yang disebut konten, ini dipotong agar sesuai dengan bentuk wadah. Hal ini menciptakan objek PowerClip.Untuk membuat objek PowerClip ™
- Memilih salah satu objek.
- Klik Efek> PowerClip> Taruh di dalam wadah.
- Klik objek yang ingin Anda gunakan sebagai wadah.
Artistik teks dan sebuah bitmap sebelum menjadi objek PowerClip.
Di objek PowerClip, teks artistik wadah, dan bitmap bentuk isinya. bitmap ini berbentuk huruf dari teks artistik.
Referensi : www.corel.com
Subscribe to:
Posts (Atom)